Install Sendy - Self Hosted Email Newsletter Application
What is Sendy?
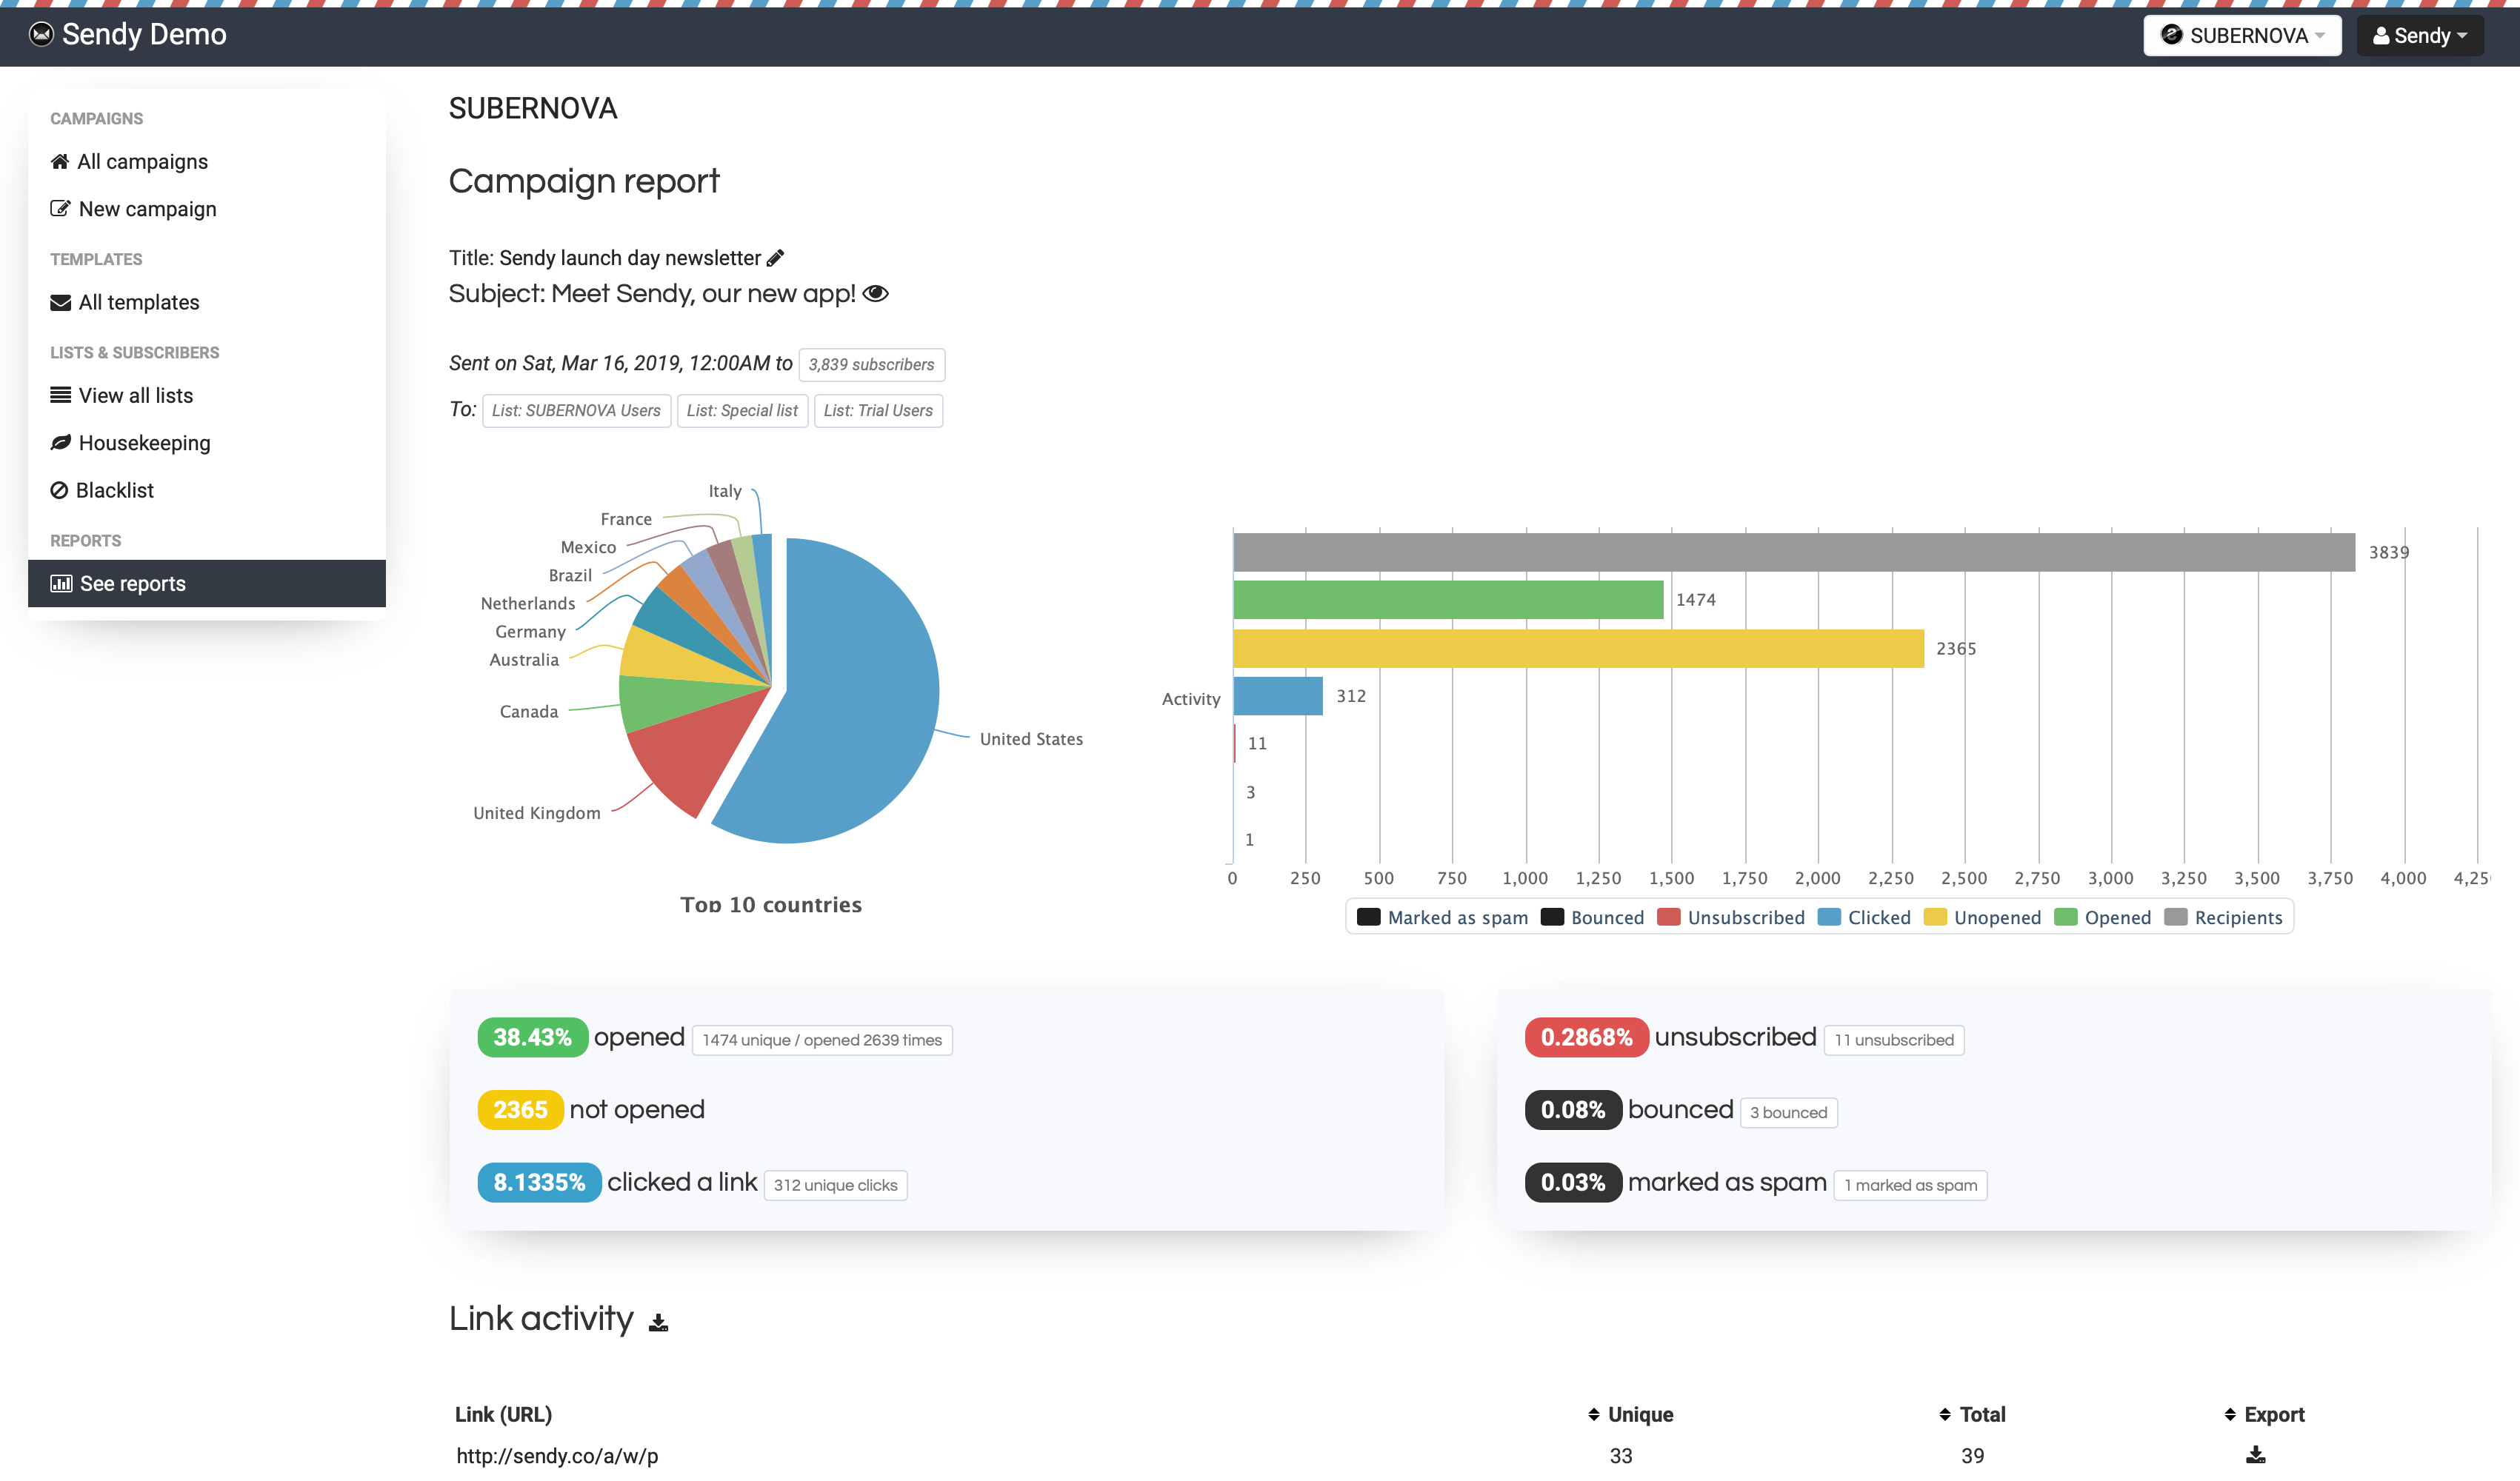
Sendy is a self hosted email newsletter application that lets you send trackable emails via Amazon Simple Email Service (SES).
To install sendy on Ubuntu, do the following steps:
- Login to server, and install package.
$ add-apt-repository ppa:ondrej/php
$ apt update
$ apt install php unzip
$ apt install php-fpm libapache2-mod-php php-mysql php-curl php-xml
$ apt install mariadb-server mariadb-client
- Let’s run the security script to harden the SQL.
$ mysql_secure_installation
$ mysql_secure_installation

NOTE: RUNNING ALL PARTS OF THIS SCRIPT IS RECOMMENDED FOR ALL MariaDB
      SERVERS IN PRODUCTION USE!  PLEASE READ EACH STEP CAREFULLY!

In order to log into MariaDB to secure it, we'll need the current
password for the root user.  If you've just installed MariaDB, and
you haven't set the root password yet, the password will be blank,
so you should just press enter here.

Enter current password for root (enter for none):
OK, successfully used password, moving on...

Setting the root password ensures that nobody can log into the MariaDB
root user without the proper authorisation.

Set root password? [Y/n] y
New password:
Re-enter new password:
Password updated successfully!
Reloading privilege tables..
 ... Success!


By default, a MariaDB installation has an anonymous user, allowing anyone
to log into MariaDB without having to have a user account created for
them.  This is intended only for testing, and to make the installation
go a bit smoother.  You should remove them before moving into a
production environment.

Remove anonymous users? [Y/n] y
 ... Success!

Normally, root should only be allowed to connect from 'localhost'.  This
ensures that someone cannot guess at the root password from the network.

Disallow root login remotely? [Y/n] y
 ... Success!

By default, MariaDB comes with a database named 'test' that anyone can
access.  This is also intended only for testing, and should be removed
before moving into a production environment.

Remove test database and access to it? [Y/n] y
 - Dropping test database...
 ... Success!
 - Removing privileges on test database...
 ... Success!

Reloading the privilege tables will ensure that all changes made so far
will take effect immediately.

Reload privilege tables now? [Y/n] y
 ... Success!

Cleaning up...

All done!  If you've completed all of the above steps, your MariaDB
installation should now be secure.

Thanks for using MariaDB!
- Next, login to MySQL console as a administrator.
$ mysql -u root -p
- Create a new database and user for sendy.
>>> CREATE DATABASE sendy;
>>> GRANT ALL ON sendy.* TO 'sendy'@'localhost' IDENTIFIED BY 'mypassword';
- Reload grant privilege for re-read access table MySQL.
>>> FLUSH PRIVILEGES;
-
Download sendy master file to your server.
-
Unzip sendy.
$ unzip sendy.zip -d /var/www/
It will extract the file and create a new folder “sendy” on /var/www/, then set file permissions of uploads folder
$ cd /var/www/sendy && chmod 777 uploads/ -R
- Update file config.
$ vi /var/www/sendy/includes/config.php
You need to update five parameters (APP_PATH, dbHost, dbUser, dbPass, dbName)
- Create a new apache2 conf.
$ vi /etc/apache2/sites-available/sendy.conf
and then enter the script:
<VirtualHost *:80>
	ServerName sendy.sibunglon.com

	ServerAdmin [email protected]
	DocumentRoot /var/www/sendy

    	<Directory /var/www/sendy>
        	AllowOverride All
    	</Directory>

	ErrorLog ${APACHE_LOG_DIR}/sendy-error.log
	CustomLog ${APACHE_LOG_DIR}/sendy-access.log combined
</VirtualHost>
- Activate the module rewrite, virtual host file, deactivate default virtual host and restart apache2.
$ a2enmod rewrite
$ a2ensite sendy.conf
$ a2dissite 000-default.conf
$ systemctl restart apache2
- If you’ve done everything as instructed, Sendy is now ready to be installed. You can run Sendy compatibility check script at following URL.
http://sendy.sibunglon.com/_compatibility.php?i=1
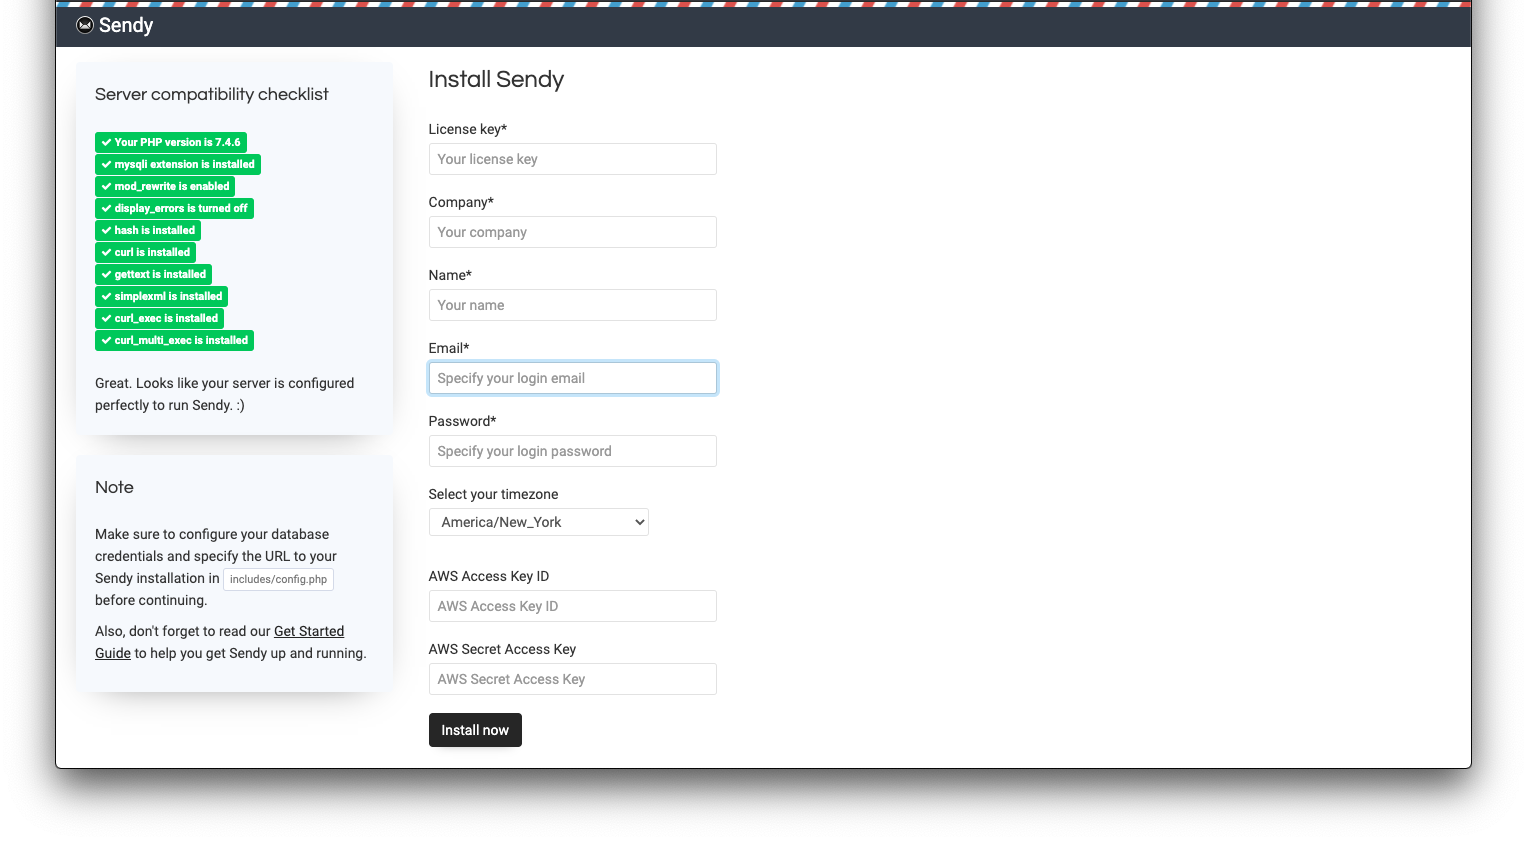
- Let’s start the installation.
http://sendy.sibunglon.com/_install.php
Enter all the information and click Install now.
- Back to server consol and setup Sendy cron jobs.
$ crontab -e
and then enter the script:
*/5 * * * * php /var/www/sendy/scheduled.php > /dev/null 2>&1
*/1 * * * *  php /var/www/sendy/autoresponders.php > /dev/null 2>&1
*/5 * * * *  php /var/www/sendy/import-csv.php > /dev/null 2>&1
*/15 * * * *  php /var/www/sendy/update-segments.php > /dev/null 2>&1
- Sign up for Amazon Web Services (AWS) & create IAM Credentials.
Sign up for an Amazon Web Services (AWS) account if you don’t have one. Click the Create a new AWS account button while at the login page to sign up.
Once signed up, you’re ready to hook up Sendy with your AWS account. To do so, you’d need to create a pair of ‘IAM Credentials’ for your Sendy installation. Start by visiting your Amazon IAM console, then follow the instructions in the video below:
Once you’ve created your IAM credentials, copy and paste them into the installation page or your Sendy settings (under Amazon Web Services Credentials). Sendy will now have access to send your emails via Amazon SES as well as setup bounces and complaints handling with Amazon SNS.
Finally, you’ll need to request Amazon to increase your SES Sending Limits to get your Amazon SES account out of “sandbox mode”. You’ll then be able to send to and from any email address as well as raise your daily sending limits from 200 per day to any number you need.
- Update Amazon Web Services Credentials on sendy settings.
http://sendy.sibunglon.com/settings#collapse0
Enter AWS Access Key ID and AWS Secret Access Key, then click Save.
Congratulations! You’re all set up, start adding your first Brand.
Please note that
http://sendy.sibunglon.comin the above link is a dummy placeholder URL, you need to replace it with your Sendy installation URL.